yum install git gcc gcc-c++ make automake autoconf libtool pcre pcre-devel zlib zlib-devel openssl-devel -y
安装libfastcommon
cd /opt/fastdfs
//下载
git clone https://github.com/happyfish100/libfastcommon.git --depth 1
cd libfastcommon
//安装
./make.sh && ./make.sh install
安装fastdfs
cd /opt/fastdfs
//下载
git clone https://github.com/happyfish100/fastdfs.git --depth 1
cd fastdfs
//安装
./make.sh && ./make.sh install
配置tracker
/etc/fdfs
cp tracker.conf.sample tracker.conf
vim tracker.conf
修改base_path = /fastdfs/tracker
# 创建上面配置的tracker目录
mkdir -p /fastdfs/tracker

# 启动tracker
/etc/init.d/fdfs_trackerd start
#查看启动情况
[root@192 fdfs]# netstat -tunlp | grep fdfs
tcp        0      0 0.0.0.0:22122           0.0.0.0:*               LISTEN      11333/fdfs_trackerd

#设置tracker开机启动
vim /etc/rc.d/rc.local
加入这句:
/etc/init.d/fdfs_trackerd start
配置storage
cd /etc/fdfs
cp storage.conf.sample storage.conf
vim storage.conf
做如下修改:
base_path = /fastdfs/storage
store_path0 = /fastdfs/file
tracker_server = 192.168.25.131:22122 #此处IP根据实际填写

#创建需要的storage目录
mkdir -p /fastdfs/storage
mkdir -p /fastdfs/file

#启动storage
/etc/init.d/fdfs_storaged start

#设置storage开机启动:
vim /etc/rc.d/rc.local
加入这行:
/etc/init.d/fdfs_storaged start
上传测试
修改客户端配置文件
cd /etc/fdfs
cp /etc/fdfs/client.conf.sample /etc/fdfs/client.conf
vim client.conf
做如下修改
base_path = /fastdfs/client
tracker_server = 192.168.25.131:22122 #IP根据实际填写
创建一个txt文件,并上传
[root@localhost fdfs]# echo "hello">a.txt
[root@localhost fdfs]# /usr/bin/fdfs_upload_file /etc/fdfs/client.conf a.txt
group1/M00/00/00/wKgZg187jumAUztfAAAABjY6MCA472.txt
#这串返回值后面测试要用,记下来
安装nginx
安装
cd /opt
wget http://nginx.org/download/nginx-1.14.0.tar.gz #下载
tar -zxf nginx-1.14.0.tar.gz #解压
cd nginx-1.14.1/
#安装到/usr/local/nginx
./configure --prefix=/usr/local/nginx
make
make install
配置
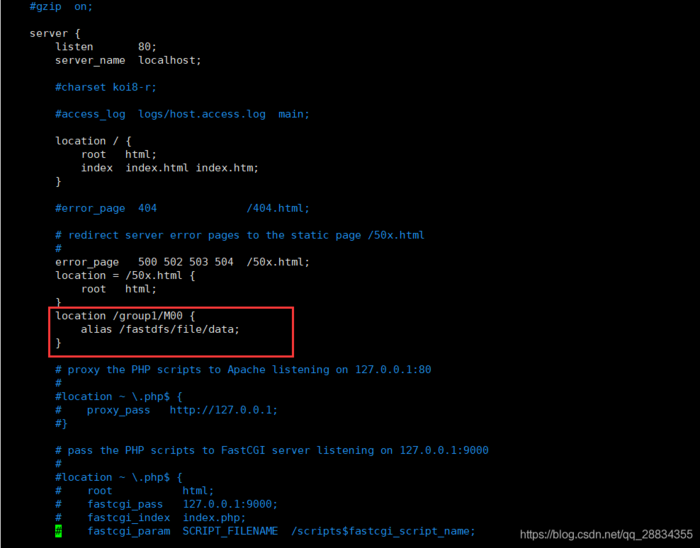
cd /usr/local/nginx/conf
vim nginx.conf
加上红框部分:
启动或重启nginx
cd ../sbin/
./nginx
或者
./nginx -s reload
测试下载
打开浏览器,输入地址:
http://192.168.25.131/group1/M00/00/00/wKgZg187jumAUztfAAAABjY6MCA472.txt
可以正常访问,则说明安装成功
